Wednesday, March 30, 2011

non-sewing crafts

I've been forced to take a short hiatus from sewing. Why, you ask?

Because I own a Devil Dog.
Aero, the Devil Dog.
She may look all cute and sweet here. But don't be fooled! She will come whipping through your craft room at 90 MPH and in one fell swoop, break the enormous (expensive) piece of glass that protects the table, and get caught up in the wires that connect the sewing machine to the power source - which will promptly cause her to drag said 20lb sewing machine onto the ground, leaving serious dents in the wood floor and also, separating the electrical cord from the foot pedal to the actual machine, rendering you powerless. Literally.

Luckily, she didn't add injury to insult by getting any glass in her paws - I don't think I could stomach another $400 vet bill, or giving (read: forcing) the dogs oral medications for 14 straight days... no, she only broke the glass, the floor and the sewing machine I JUST spend $85 on to tune up. Ah yes, that's my girl.


But I've been meaning to complete a few glue gun projects around here anyway, so I took the time to make a spring wreath, put some green ribbon and "leaves" on the stems of my germ-free flowers, and completely re-do my chair for the office... where I work in my real job.


Before...

After (front)

After (back)

Denim covered buttons hide staples well

Nice...
Was the banner with my name really necessary? No, of course not - but it is fun. The fabric is a greenish tan, and actually it's leftover from when I covered the cushions on my front porch seat. It's pretty durable, and hopefully it will stand up to office grossness. I have to admit that I didn't plan well (shockingly) and ended up short (quite a bit) of fabric for the seat. So I took one of the cushion covers off the front porch. No-one will notice, right?

Additionally, I just kind of "went at it" with a staple gun - no plan, no pattern. I'm beginning to learn that this method usually only works about 65% of the time - but hey, that's a majority.

In better news, Dan was able to fix my sewing machine without me having to send it to Schiller's, which is nice, and I should be back on the wagon by tomorrow night. Keep your eyes peeled until then!

Friday, March 25, 2011

My Other Wedding

When I first started conceptualizing our big day, I had about a thousand different theme ideas swirling around my head. One of my favorites (yet, obviously not THE favorite) was to do a "worldwide" or travel-inspired wedding. Dan and I have been lucky enough to do quite a bit of traveling, and I wanted to express that love through a bunch of really adorable wedding items.

I had this grand idea for a centerpiece, travel-inspired escort cards (and no, the idea wasn't luggage tags, which is so overdone in my opinion). Anyway, the list goes on and on. But I will tell you what, if I had done that wedding theme instead, I would have copied the wedding invites from Labor of Love - this girl (and her graphic designer Husband) are full of pure genius!


If you want to see her post about these worldly invitations, click here. For more of my ramblings, read on.

I did mention to Dan the other day that "maybe we should have a wedding every 5 years." He chose not to respond - a good move. But in all seriousness, I could have gone in so many different directions with this wedding that we just might have to keep getting married.

Try to stop me!

Wednesday, March 23, 2011

The Dress

I went down on Monday to put the dress on: good news! It fits! YAAAAAAAAAAAAAAAAAAAAAAAAYYYYYYYYYYYY! Actually, they will need to take in the very top of the bust and sew in some cups so my boobs are up where people can see them. Hey, if you got it, flaunt it, right?

The jewelry and headpiece work well with the dress, and I ended up picking the earrings "to the left" from the last post... but I've changed my mind before so we will see how it goes. I know it's a crappy picture (from my phone, that my Mom took looking up rather than down - she's no photographer), but what do you think?

Sunday, March 20, 2011

Jewelery and headpiece...

I finally got the call the other day.

You know, "the" call.

My dress is finally in! I nearly jumped out of my chair with excitement when I saw the number on the phone. Now, now - don't start thinking I'm one of those brides who is obsessed with the dress (and shows about dresses). I'm not that bad. The thing is, I have never actually seen my dress before. I saw a very very similar dress - the one the designer made... but this is the dress I made - well, not really. Actually its almost the same as the designers original, I just changed the neckline, added some bling to the buttons, cut off the train and had them add pockets.

Anyway, the point is - the dress is finally here for me to see. When the woman called me to let me know it was in, she added; "we have a note here to remind you to bring your Grandmother's jewelry..."

Err... right.

ugly attempt at cute headband.
Back when I first put in the order for my dress, I had tried on a headband. LOVED the headband, thought it was cute and unique. BUT... the headband was $200 and it was made out of simple elements that I had access to. I had also picked out some very simple jewelry that would balance all the bling of the headband. It was very simple. So simple in fact, that as soon as we left the shop, I started to regret that decision. But I drove home cheerfully thinking of how easy it would be to recreate the headband I so loved. Right. I tried for a few months to copy said headband. The results were absolutely disastrous (see?). I tried so many ways to make a cute headband... from taking apart blingy jewels from Forever 21 (see right) to making one out of seed beads based on an adorably cute bracelet I saw. Well, that didn't go over at all. Seed beads are realllllllly tiny. Too tiny for my big fingers, so scratch that idea.

I think I spent about $150 in the process of trying to not spend $200 on a headband and yet - I still do not have a headband. Sometimes, DIY just goes wrong. Horribly, Horribly wrong. I became so disenfranchised over the headband that I started to hate it. Magically then, I hated the whole idea. No headband, no simple jewelry that I didn't even like.

Fast forward to about a month ago when I was cleaning out my jewelry box and stumbled upon a set of rosary beads that I had taken from my great grandmother's hoards of jewelry after she passed away in 1998. My Great Grandmother was not Catholic, so I think she had these rosary beads simply because she liked the jewels on them. I don't know why out of all that she had I picked the rosary beads, probably because I was religious at the time.. or maybe I just liked the way they looked too. Whatever the case, when I found them a month ago, I decided that I would take the necklace apart and use the beads to create something new... well really, it was something old. Two birds, one stone!

I had called the dress shop to see if I could get a refund for my simple jewelry because I had my Great Grandmother's beads that I wanted to use as my something old. They told me I should wait until the dress came in and then bring it down to see if I liked how it looked all together.

Only.... I never made the necklace and earrings, I had only disassembled the rosary beads and cleaned everything. That was Friday afternoon.

Today:


Yes, I spent some time on these this weekend. I had to mess around quite a bit. Initially, I wanted to have rhinestones on the necklace, but I couldn't figure out how to get the small rhinestone buttons I had purchased onto the chain while keeping them all facing the same way. Then, I made a few sets of earrings, the two pair shown here are the only two that were any good. The set to the left is what I wanted, but they don't hang as pretty in my ears as they do on the basket here. So I don't know which pair I will choose, but both of them are cute enough. I have quite a few of the beads from the rosary left over, so I will probably make a bracelet. But I'm going to save 1 bead each for the bridesmaids who are descendants and put it on the necklaces I made them in the same place I put the blue beads on my necklace above. 

Finally, about an hour ago, I conquered the "head piece". I decided that I wanted to copy the silk shantung flower on my dress, and put them in my hair. The results:
spin and twirl method

spiral sewn method.
The flower on my dress was made by the spin and twirl method, but I think I like the spiral sewn flowers I made better, they just seem a bit more polished. For a DIY tutorial on the flowers, you'll have to consults the pros:  Spin and twirl here, spiral sewn here. Though clearly, I used the glue gun for steps 7 and 8 for the spiral sewn flowers. Hand sewing is for chumps.


So what do you think? Which set of earrings? Which flowers? I'll be sure to let you know how the dress looks tomorrow.

Wednesday, March 16, 2011

Better Homes and Gardens copy

Seen the April issue of BH&G? This was in there. I copied it in about 45 minutes - genius and adorable!

Tuesday, March 15, 2011

DIY Monogram Beach Bag

I told you that I have been busy doing wedding things, and I have - I swear. A lot of those things have been pretty lame: calling vendors, sending checks, stocking up on supplies to start all of these DIY things I intend to do. But there have been some projects tossed in there; one of which is below.

Since I fully intend on exploiting my bridesmaids to accomplish said projects, I figured that I better reward them adequately - and it never hurts to pay up front. A while back I had this idea to give them a bag full of items that they could use during the wedding weekend, but I didn't know exactly what would be in that bag until I found this adorable set of beach bags. They are a combination burlap/raffia and just about the most Cape-Cod-esque things I have seen in quite some time. Since I intend to have perfect weather the weekend of the wedding, I planned a canoe trip for the day before just to get people relaxed and having fun together. These beach bags are perfect for that! Not only do they look beachy, but they are big enough to hold all of the things you need to spend an afternoon in a canoe: towel, sunglasses, flip flops, beer, etc.

The problem with these cute bags is that they needed something extra to make them pop and seem exclusive (after all, isn't that what being in a wedding party is all about?) So I got an idea to jazz them up a bit, and very fortunately - it worked! The first time! Unbelievable luck! So below, you will find the step by step photo tutorial on how to make your own. (ps - bridesmaids of mine: you may want to stop reading if you like surprises).

My printer wasn't working, so I had to get ghetto and trace the letters from the screen. I used the font "fireflies"

After tracing, I glued the paper to a piece of cardstock for heft and cut out the lettering. You could use an exacto knife, if you are coordinated like that... I'm not. Be sure when you cut little circles, etc that you put them on the bag in the next step, or it wont work.

I put a piece of cardboard between the top layer of the bag and the bottom layer. wax paper probably would have worked too, but I didn't feel like going downstairs.
Spray the bad side with craft adhesive - I used Elmer's - and then put down on top of bag. Secure in place by rubbing your fingers over the edges. See the loops I am holding here? Don't forget about those!
There they are!
Once your stencil is securely in place, dab fabric paint on with a sponge brush. I used Tulip paint in black. Make sure you dab, a stroke would be disastrous!
When you are done (before the paint dries) carefully peel off your stencil.
Aw, it looks so good!
I used a pin to get those little loops unstuck - my fingers are far too large and clumsy.
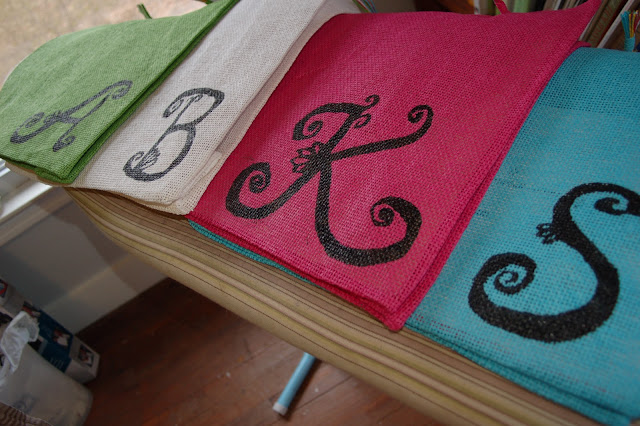
viola! Quite a cute bunch, aren't they? I left the cardboard in place overnight for the bags to fully dry... it came out just fine the next day.

all crafts Homemade Projects ~ Add Yours! Tip Junkie handmade projects

Thursday, March 10, 2011

Delinquent.

So I've been awfully delinquent about a lot of things. Especially about wedding things. But - I just passed the 6 month mark the other day and it got me all frazzled. So I promise to you, loyal readers, I will post! I promise!

Stay Tuned!