Tuesday, April 26, 2011

DIY L.L. Bean Tote Bag

When you get married in another state, and 99% of your guests are traveling there, you really do HAVE TO provide welcome bags. I mean, it's the least you could do after you forced all those people to travel 5 hours away from their homes, and pay gas prices that would make a grown man cry (in my defense, I had no idea gas was going to get so out of control).

Anyway, I'm making welcome bags for my lovely guests - something that I probably would have done even if I got married in CT, but it being a Maine wedding, I have this theme that really lends itself to a certain kind of bag: LL Bean Tote bag. They are adorable, iconic, summery and they really do scream "Maine". But when you have 118 of your 120 guests coming from out of state, then you really have to put the pedal to the metal with the making of the bags. So far I have made 6... I figured I need about 35 bags, and 12 "baskets" for families of 5+ staying together.

Anyway, the making of the bag is actually fairly simple:

Supplies:
2 (8 x 14) pieces of White duck cotton*
1 (8 x 14) piece Navy Blue duck cotton*
2 strips (30 inches) of ribbon or belting
white and navy thread
stitch withchery

*this is the size, method and colors that I used. You could use canvas if you wanted a sturdier bag, but keep in mind that you'd also need a heavy duty needle, good thread, more money and patience, because its not the easiest to work with. Also, I used these colors because they match my wedding, any combination or size would do.


On your 2 white pieces, iron down a 1/2 inch seam
like so

sew this down - it will be the top of the bag
Take your blue piece and iron down 1/2 seam on both sides

like so - do not sew down!

on your two sewn white pieces, you will add your handles - 1 (30 inch) strip per side. For this size bag, I put the handles at the 4 and 10 inch lines, leaving 4 inches between. The stitch witchery is underneath, waiting to make things meld - remember that the side your sewed should be the top!

then make the melting happen for the stitch witchery. You don't have to do this step if you prefer pinning, but I just find this to be easier

sew the handles down. If you used stitch witchery, you will notice that this is no hassle of removing pins, pricking yourself, or the dreaded "bunching and gathering" - signs of a crappy seamstress - which I am.

Once you have sewn on the handles for each white piece, you will want to pin your blue piece on, good side out. It is important that you measure the distance from the top of the white to the blue part and keep it the same for both pieces and sides, otherwise you end up with a bag that does not line up.


See then? your bag is almost a bag!
sew the blue in place

flip the almost bag inside out and pin the edges just above the blue piece

This is the tricky part - you want to fold the blue into itself

like so..

can't describe it really, just make it look like this

and then iron it down

I just had to keep taking pictures because I knew I wouldn't be able to explain how to do it

But really, this is how it should look.

sew down the sides of the bag, making sure everything lines up perfectly. When you are done - this is what you will have

Iron down those flappy edges

and boom, you have a cute little tote bag in 30 minutes! If you wanted to line your bag with a pretty contrasting fabric, you would repeat all the steps, flip your contrasting bag inside out, put it inside the original tote and then sew the top edges together.

I'm making 35 of these bags, so there is no way I am making a lining! But you easily could. My sister came over last night to help. We managed to get steps 1 and 2 done for 25 bags.

And we still need 10 more!
But, the good news, for me anyway, is that I will have a really cute, completely original set of welcome bags when I am done... and hopefully some people will actually use them for some amount of time.

When we were done, and my sister left, I finished up the bag you see in the tutorial, and then took a deep sigh knowing how much more work had to be done. As I cleaned up my craft room (HA!) and headed for bed, I saw the cutest thing ever:

totally worth it.
Tip Junkie handmade projects

Monday, April 18, 2011

$5 Rocking Chair

I have this awful habit of acquiring things. Some people might label me a hoarder, but it's not at all like that... not yet anyway.

I just tend to see things differently than a lot of other people... for example, I look at a banged up dresser on the side of the road waiting for the garbage man to come, and instead of junk, I see my latest street treasure: a white (or maybe teal?) lightly distressed dresser with fancy anthropology knobs and pulls, decorated with a silver tray of pearls and a rustic oval wooden picture frame, complete with a pink floral scarf jumping out of the top drawer situated atop a seagrass rug. Yes, I often see things that aren't there (and I know this makes me a loon).The problem with seeing things as I want them to be, and taking them home as they are - is the whole in-between phase. The work. I'm not super good at actually seeing a project to completion, at least not right away. Its very unusual for me to have less than 5 projects going at once (on top of everyday projects like dinner, laundry, work, exercise).

But in an effort to make Dan happy, I have been trying really hard lately to finish things I've started and turn some of the trash I take home into street treasure.

So then, a story about a place straight out of every at-risk-hoarder's dream: ReCONN. This place is loaded with treasure... it's very hard for me to not go home with a ton of junk every time I go here (which is why I stay away). Fortunately, I no longer own a vehicle that is big enough to carry anything, so that tends to keep me under control. Anyway, I took Dan to ReCONN one day back in January when we were looking for a kitchen sink. We didn't find the sink, but I did find this ratty old rocking chair for $5: STEAL!


But obviously, it needed some love. It just so happened that a few days later I got an e-mail from the Manchester Historical Society (who always offers all kinds of awesome programs) about a chair caning class that would take place on Saturdays during March. So, for $10, I enrolled and for an additional $20, I bought the supplies for fixing my chair. And then poof, in about 4 weeks, I had this awesome new rocking chair for a grand total of $35 - definitely worth it!


Friday, April 15, 2011

Less than glamorous DIY

So we all think of DIY as an affordable and easy way to make something unique or personal for your wedding. We have an idea, gather supplies and then poof, magically those supplies turn into something adorable all in one post!

Well, not always. Sometimes there is a very ugly side to DIY Wedding Projects... and I call that ugly side Mondays at Mom's. For the time being, I have Mondays off, and I've been spending a number of those Mondays at my Mom's house working on the wedding projects that kinda suck. Mostly, the dishes.

Ah yes, my grand idea to have mis-matched blue and white dishes. I had seen it on some blogs and in a few magazines, but it was always in CA, where vendors are endless and they always have a ton of options available. Or at a wedding with only 50 guests - where between the MIL, Mom, Grammas, etc. you had enough place settings to not spend any money at all.

Well isn't that nice for them? My rental place in Maine did not have mismatched dishes... they didn't have any blue dishes come to think of it, and that is what I wanted. So I decided that I could go out and buy different blue and white dishes from tag sales and places like goodwill for around the same price I could rent the boring white china. That was April of 2010. By December, 2010 I had amassed the entire collection: enough for 120 place settings including dinner plate, salad plate, tea cup and saucer, and soup bowl. Not too shabby! Actually, it was a lot of fun and I would highly recommend it if you like to be on the hunt for things.


But then, the fun disappeared. And the beginning of the end started with me lugging all of those dishes to my Mom's house... down a flight of stairs from the attic, another flight to our main floor, 3 steps off the deck, across the 2 inch sheet of ice that was on my driveway in January (and February, and March) 15 miles to Columbia, across my Mom's sheet of ice and down another flight of stairs into her basement.


Then, because I am apparently a control freak, we went about matching each bowl to each plate to each dinner plate. And when all 120 were matched up nicely, we matched them up in sets of 8 so that they made sense on a table together... God, we are picky. As we successfully made one set of 8 after another, we labeled each setting so that the caterer would know exactly what dishes went together.

That process probably took us 3 days on it's own. But then we started doing some of the real ugly work: washing the dishes, sewing fabric "folders" so that they would stay clean and safe in their 7-8 month journey from my Mom's basement to the tables in Maine. I'm very fortunate that my Mom has been extremely helpful in this process. She has made a ridiculous amount of the fabric folders, washed the dishes and packaged them up in our white rubbermaids. AND - she has been planning my bridal shower. She's a 5-star Mom, I'll tell you that.


It's an ugly process, there's no doubt about that. But hopefully, the end results will have been well worth the effort.

Tuesday, April 5, 2011

DIY Bikini Bag (keep the rest of your luggage dry)

When I go on a vacation that mandates I bring along a bathing suit, it's pretty much assumed that said bathing suit will be wet by the time I have to pack up and go home. And then I do the frantic plastic bag search... sound familiar?

But then, some genius invited the bikini bag. I don't know who it was, but it was a grand idea: bring your bathing suit home wet, keep the rest of your stuff dry. The science behind it is basic stuff, so I assumed I could make one myself.

In Mandy-Fashion, I went out, bought the supplies for 4 bikini bags (for the maids) and then let them sit in my craft room for the appropriate amount of "aging". Everyone knows that you have to "age" stuff before you can use it - at least, everyone in my family knows that.

In more Mandy-Fashion, I whipped out the supplies last weekend and decided to "just go at it" without a plan in mind. Turns out: it worked! Huzzah! Want to make a bikini bag for yourself? Well, if you've got the supplies and about 20-30 minutes, you can... read below:

Supplies:
Supplies
scrap fabric for the bag (I used duck cotton) about 8 x 16 inches
plastic material (I used a lacy tablecloth cover) 8 x 16
6 inch zipper
paper backed fusible webbing enough for the bikini pieces (about 4 sq inches)
fun colored scraps for bikini pieces (4 sq inches worth)
Embroidery floss (about 3-4 inches worth)
Bikini clip art (can be found on google images)


Steps*
Step 1
*Anyone should know that if I am the one making the steps, there is probably a better way to do it, so feel free to improvise... this is just a guideline*
1. First things first: iron a 1/2" seam on your cotton - you'll def. want to do any ironing before you sew on the plastic material!
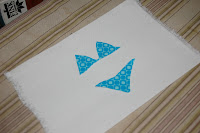
2. Cut out the bikini and use the fusible webbing as directed to create the bikini pieces in your lovely scrap fabric.
3. Iron the bikini piece to cotton exactly where you want it to be, keeping in mind that if you want your bag to stand up, like mine, you will loose
Step 2


some of the length.
4. Now is a good time to add on the embroidery floss or "strings" of the bikini. I hand-sewed the ties into place, and left the other pieces to be glued down later.
5. Sew the plastic piece under the 1/2" seam, but not attached to it. Be sure that you are sewing the wrong sides together.
6. Sew the zipper onto the 1/2" seam you created in step 1. I can't give more directions than this on zippers: I'm a total novice. I don't even have a zipper foot (read: I have a lot of broken needles)
Step 3
7. Sew the sides of the bag together, using a 1/2" seam allowance.
8. If you want your bag to stand up like mine, sew across the corners.
9. Flip inside out and viola! Instant Bikini bag! You can choose to glue down your "strings" at this point if you'd like, but fabric glue does take a while to dry, so don't touch it for a day or so.


Step 4
Step 5


Step 6
Step 7


Step 8


Standing, with my red polka dot bikini sticking out

Isn't this cute? I do hope that my bridesmaids like this addition to their goody bag that I am giving them!


Photobucket


Tip Junkie handmade projects